Video #1: Stop Motion Studio Tutorial
|
|
Helpful Information:
The Movie Editor:
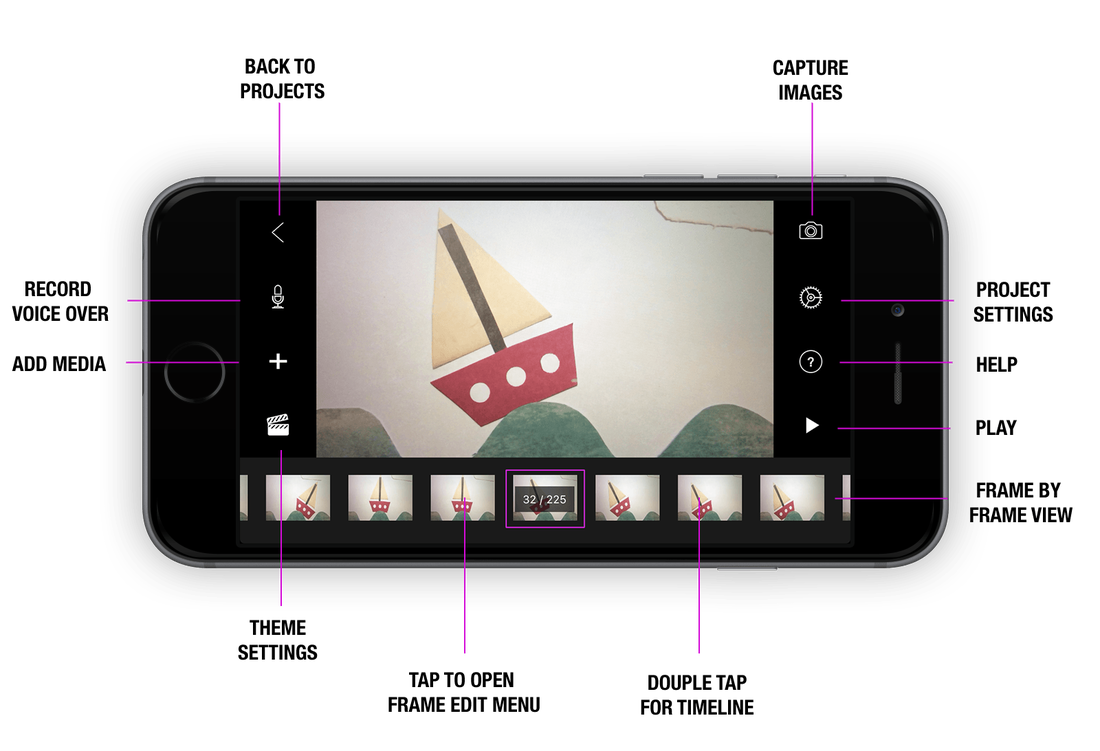
This is the central hub where the magic happens. The movie editor allows you to capture, preview and edit your movie. It consists of three main parts. The live preview, where you can see the current frame, the timeline and the the frame-by-frame editor. The frame-by-frame editor shows you all the images you took in chronological order.
This is the central hub where the magic happens. The movie editor allows you to capture, preview and edit your movie. It consists of three main parts. The live preview, where you can see the current frame, the timeline and the the frame-by-frame editor. The frame-by-frame editor shows you all the images you took in chronological order.
Project Settings:
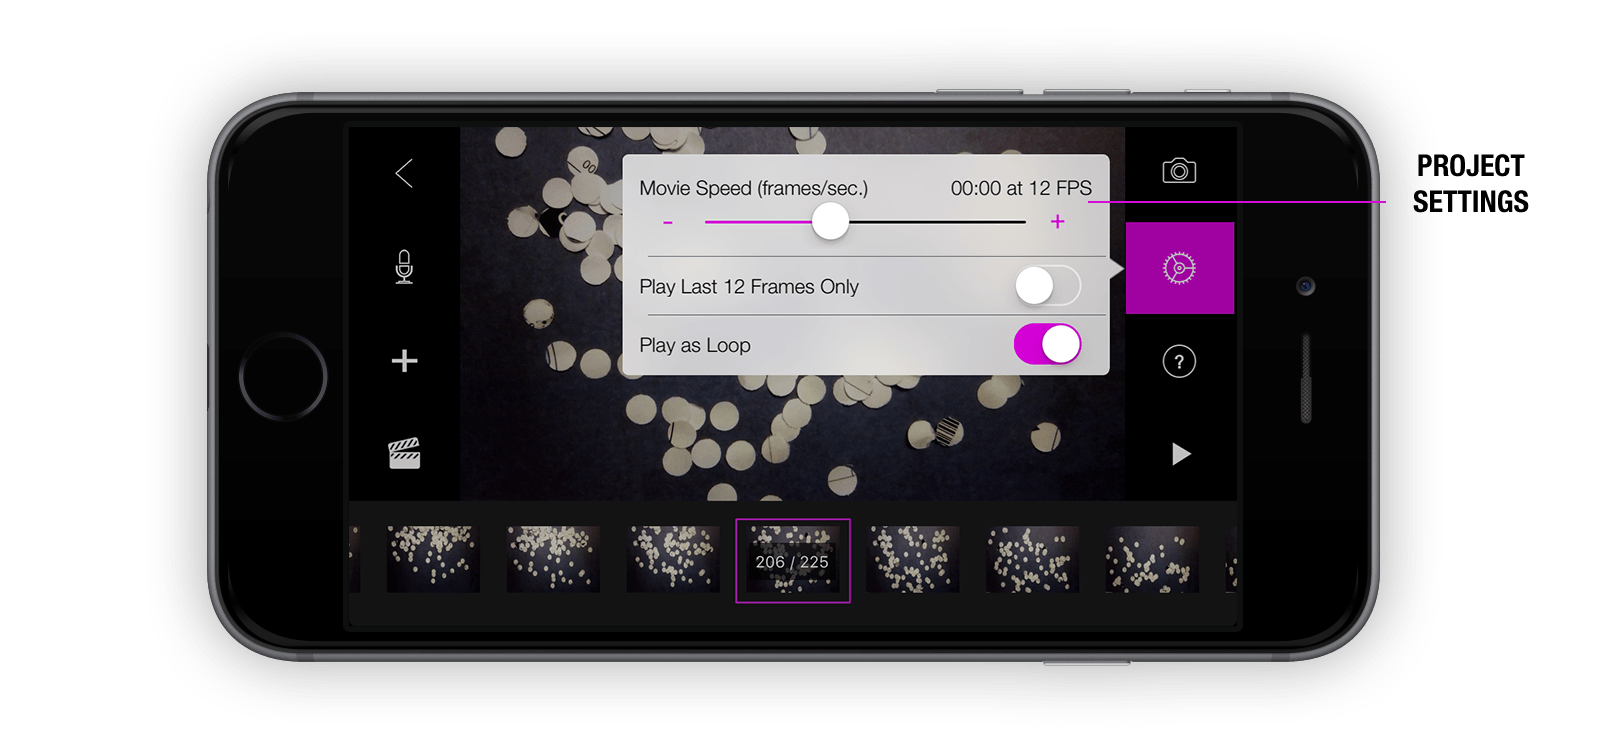
In the project settings you can adjust the speed or change the way the movie preview is played.
In the project settings you can adjust the speed or change the way the movie preview is played.
- While in the movie editor, tap the Project Settings button .
- Tap anywhere outside to close the project settings.
Adjust the Speed of your Movie:
You can adjust the speed of your movie in the project settings. The speed is defined as frames per second or FPS. Keep in mind that the more photos you shoot, the smoother the video will be. A regular movie on TV contains about 25 frames for each second in the film. Start by using 6 frames for each second in your movie. If you feel your movie looks unsteady use 12 or more frames per second.
You can adjust the speed of your movie in the project settings. The speed is defined as frames per second or FPS. Keep in mind that the more photos you shoot, the smoother the video will be. A regular movie on TV contains about 25 frames for each second in the film. Start by using 6 frames for each second in your movie. If you feel your movie looks unsteady use 12 or more frames per second.
- While in the movie editor, tap the Project Settings button .
- Drag the slider to the left to slow down the movie or to the right to speed it up.
- Tap anywhere outside to close the project settings.
The Frame-by-Frame Editor:
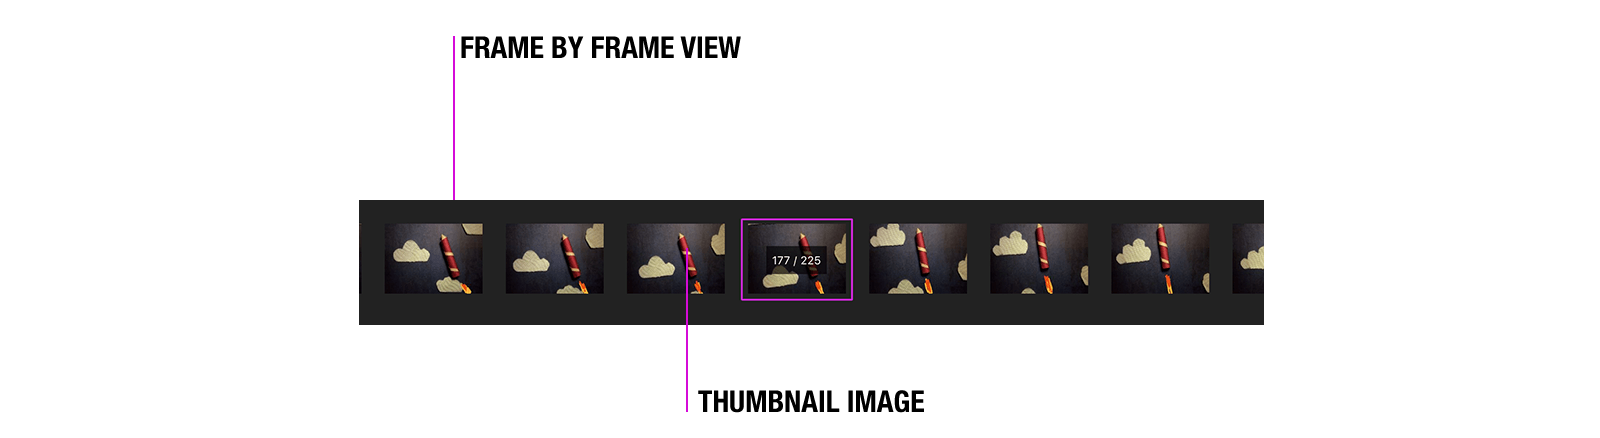
The unique frame-by-frame editor shows you all the images you took in chronological order, much like the single frames of a movie. Each frame is represented by a thumbnail image. You can scroll around to see all the images you’ve captured. Taping a thumbnail will open the frame edit menu to edit, copy and paste or delete the frame and more.
The unique frame-by-frame editor shows you all the images you took in chronological order, much like the single frames of a movie. Each frame is represented by a thumbnail image. You can scroll around to see all the images you’ve captured. Taping a thumbnail will open the frame edit menu to edit, copy and paste or delete the frame and more.
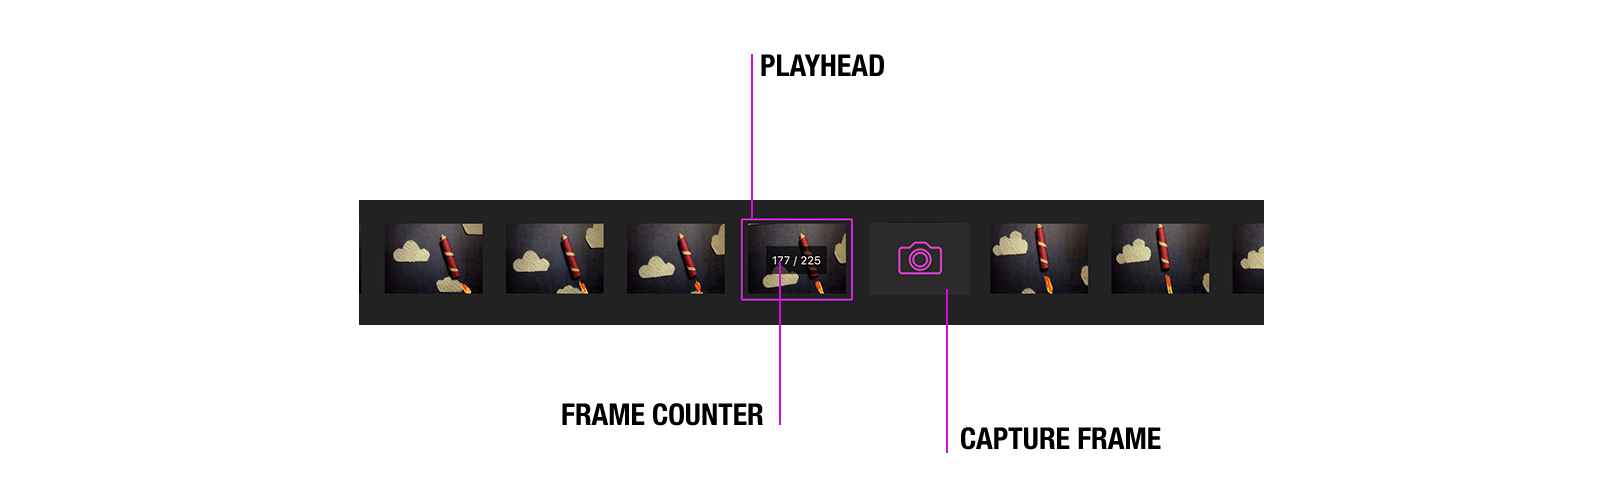
Frame Counter, Playhead, and Capture Frame:
- The playhead is rectangle in the middle of the frame-by-frame editor that indicates the current position in your movie. In the timeline the playhead is a vertical line. Drag your finger back and forth to move the playhead position in your movie. If you add a text card, an image or an audio clip it will be inserted at the playhead position.
- The frame counter displays the frame number of the playhead position as well as the total number of frames in your movie. If you move the playhead the frame number will reflect the new positon.
- The capture frame is a special frame within your timeline. It has a camera icon on it. The capture frame is a placeholder for the next image you capture. If you move the playhead to the capture frame position you can see a live view from your capture source (iPad only). The frame counter will tell you the frame you are about to capture.
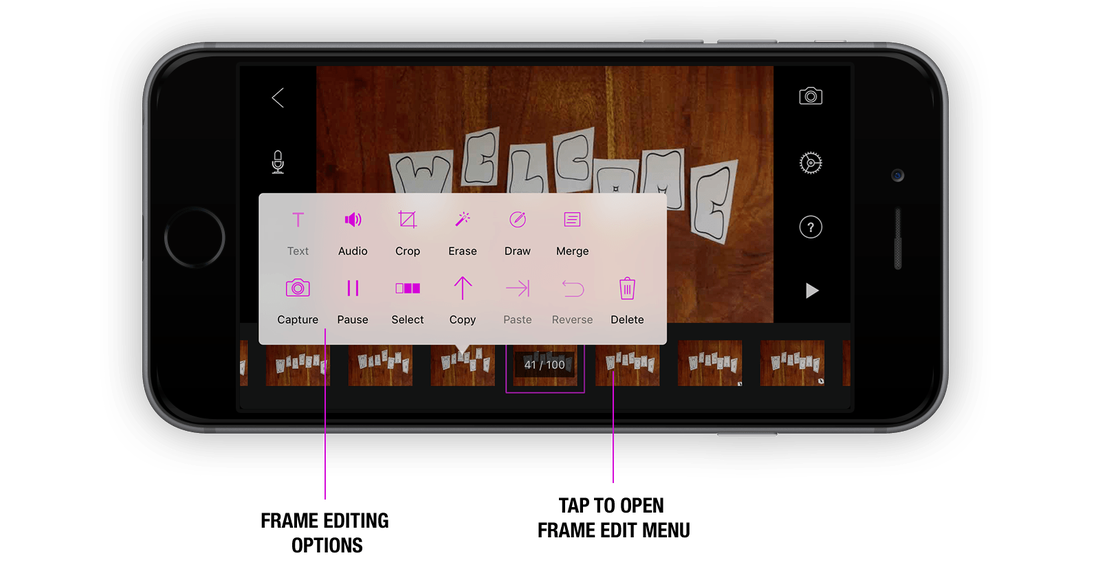
Delete, Copy Paste, and More:
If you shot a frame you don’t like or one that jiggled, you can easily delete it. Or you want to copy and paste frames, add a text, paint on it. All of those options can be reached from the frame edit menu.
If you shot a frame you don’t like or one that jiggled, you can easily delete it. Or you want to copy and paste frames, add a text, paint on it. All of those options can be reached from the frame edit menu.
- While in the movie editor, tap a frames thumbnail in the frame-by-frame editor.
- Do any of the following:
- Tap Text to change the text on a text card.
- Tap Audio to add or edit the audio clip attached to the frame.
- Tap Crop to crop the frames image.
- Tap Erase to use the Magic Eraser to erase unwanted parts from the frames image.
- Tap Draw to paint on the frames image.
- Tap Merge to merge multiple frames to simulate movement.
- Tap Capture to set the capture frames position.
- Tap Pause to pause or freeze the frame.
- Tap Select to select or unselect frames within the frame-by-frame editor.
- Tap Copy to copy the selected frames into the clipboard.
- Tap Paste to paste frames from the clipboard into the movie.
- Tap Reverse to reverse the selected frames.
- Tap Delete to delete all selected frames.
- Tap anywhere outside to close the frame edit menu.
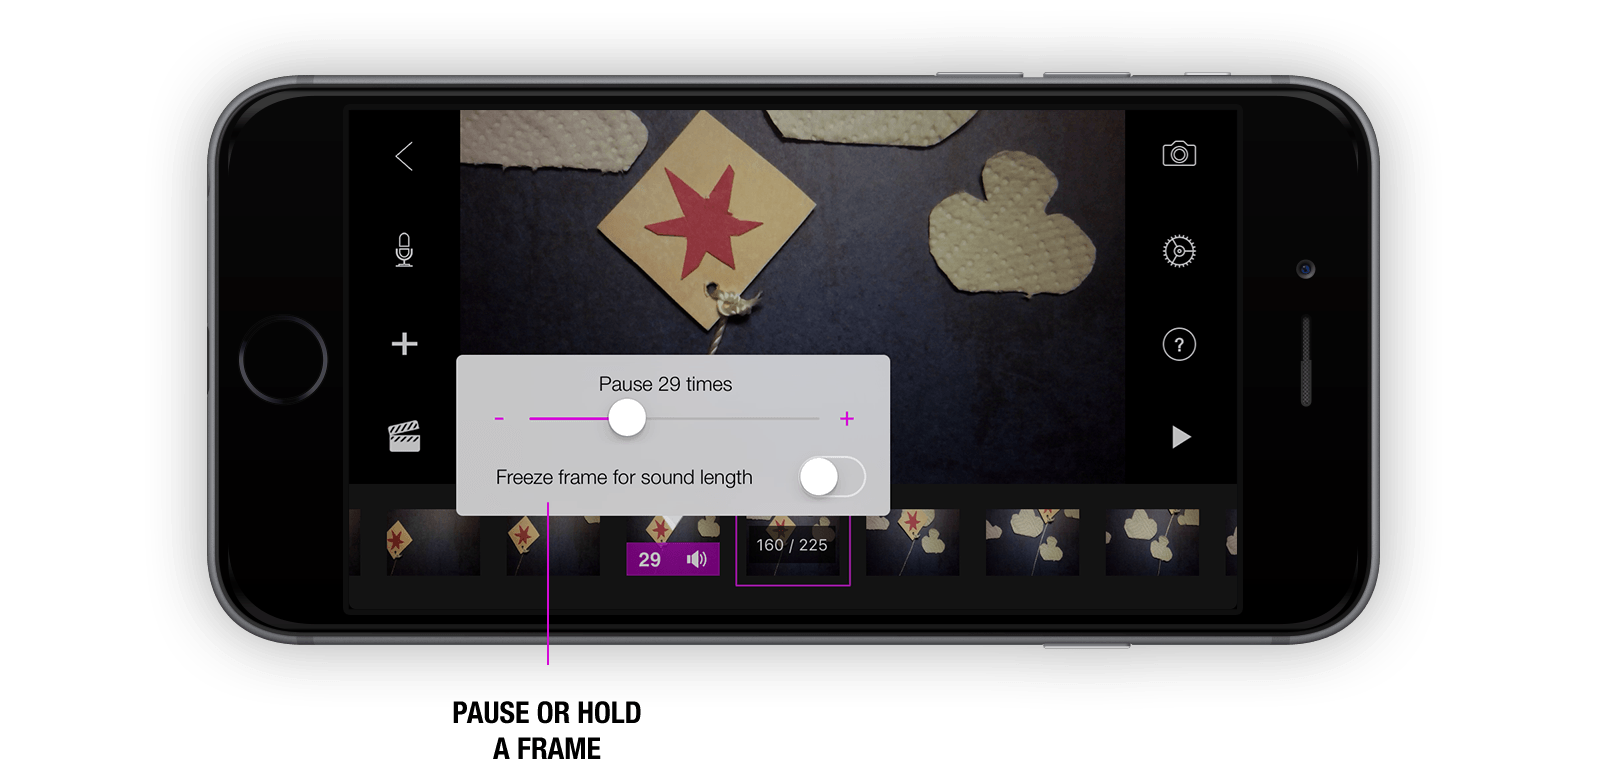
Hold or Pause a Frame:
Want a frame to be displayed for a few seconds? You can do so one of two ways: you can either capture the image several times in succession; or just choose the pause option. Pausing, also known as holding or freeze frame, is the same as copying and pasting the frame multiple times.
Want a frame to be displayed for a few seconds? You can do so one of two ways: you can either capture the image several times in succession; or just choose the pause option. Pausing, also known as holding or freeze frame, is the same as copying and pasting the frame multiple times.
- While in the movie editor, tap the frame in the frame-by-frame editor to open the frame edit menu.
- Select Pause from the frame edit menu.
- Select how long you want to pause the frame. If the frame has an audio clip attached to it you can also opt to pause the frame for the duration of the audio clip.
- Tap anywhere outside the popup to close it. The number on top of the frames thumbnail shows the length of the pause.
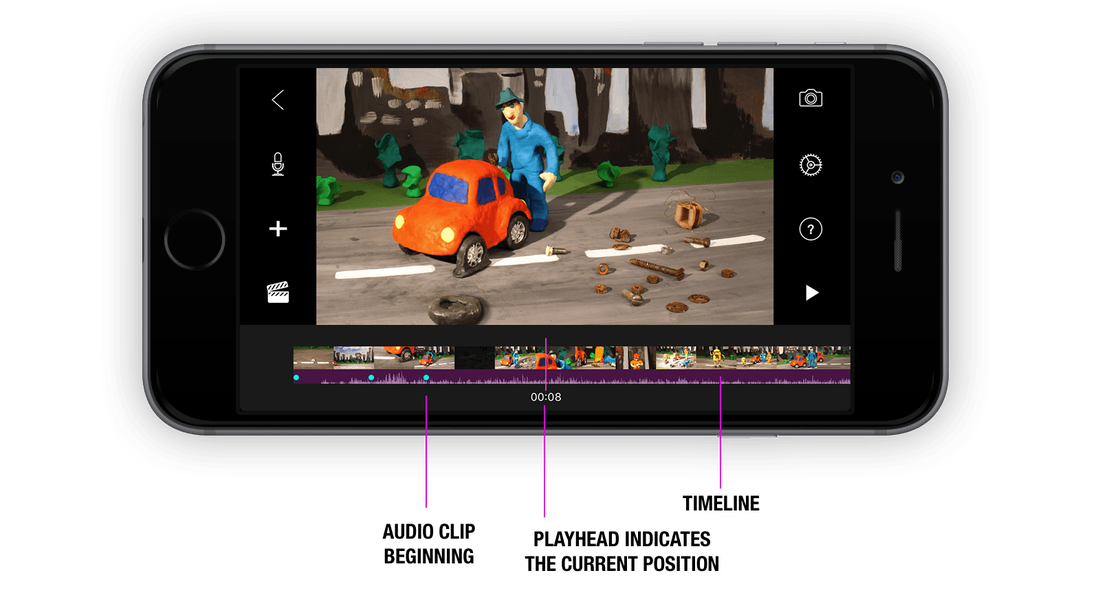
Navigate in the Timeline:
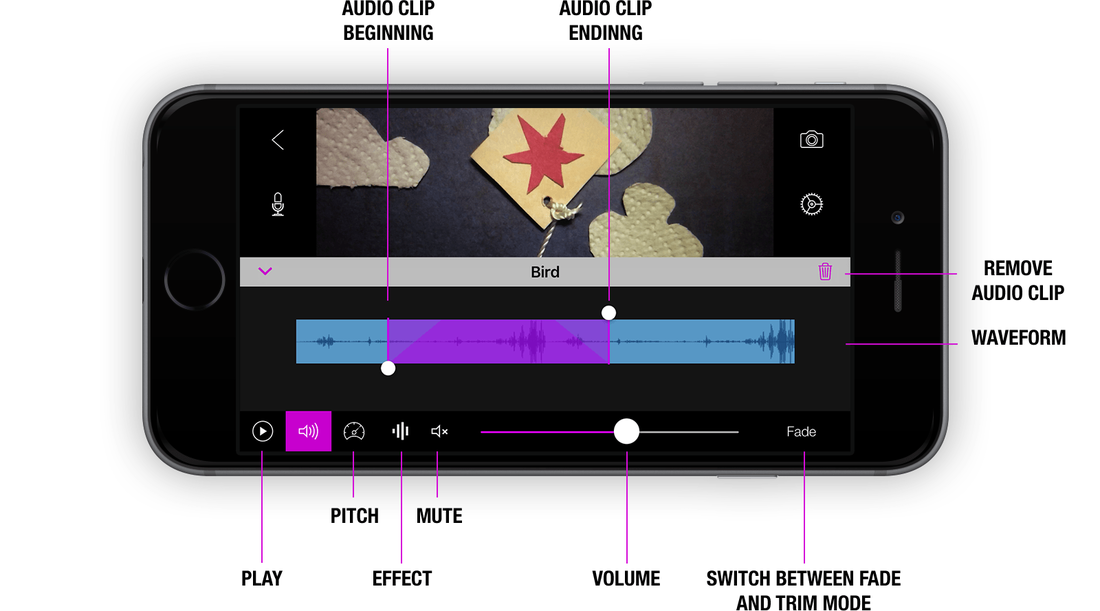
Never get lost even if you take hundreds of pictures. Use the timeline to navigate to various sequences or frames in your movie. The timeline also visualizes the audio of your movie as a waveform. The shape and form of the waveform represents the music and audio clips added. A low waveform symbolizes a softer sound whereas a large spike symbolizes a louder tone. The waveform display also shows a little dot indicating the beginning of an audio clip.
Never get lost even if you take hundreds of pictures. Use the timeline to navigate to various sequences or frames in your movie. The timeline also visualizes the audio of your movie as a waveform. The shape and form of the waveform represents the music and audio clips added. A low waveform symbolizes a softer sound whereas a large spike symbolizes a louder tone. The waveform display also shows a little dot indicating the beginning of an audio clip.
Zoom In or Out:
Zooming in lets you see more detail. Here you can see every single frame in your movie. Zooming out lets you see your entire movie at a time without much scrolling. This makes it easier to trim audio clips or scrub within the movie.
Scrub Video:
Scrubbing is another way to quickly preview your movie. When you scrub, you manually move backward and forward through the movie so that you can view the animation in detail. Audio is disabled during scrubbing.
Record Audio:
You can record audio, such as voiceovers, directly into your Stop Motion Studio project.
Add Audio and Music:
Now it’s time for the finishing touches.
Zooming in lets you see more detail. Here you can see every single frame in your movie. Zooming out lets you see your entire movie at a time without much scrolling. This makes it easier to trim audio clips or scrub within the movie.
- Double tap in the frame-by-frame editor to zoom out to the timeline.
- Double tap in the timeline to zoom in to the frame-by-frame editor.
Scrub Video:
Scrubbing is another way to quickly preview your movie. When you scrub, you manually move backward and forward through the movie so that you can view the animation in detail. Audio is disabled during scrubbing.
- Double tap in the frame-by-frame editor to zoom out to the timeline.
- Drag your finger back and forth along the timeline to scrub through your animation.
- When done, double tap in the timeline to zoom back into the frame-by-frame editor.
Record Audio:
You can record audio, such as voiceovers, directly into your Stop Motion Studio project.
- With your project open, scroll the timeline so that the playhead appears over the place where you want the recording to begin.
- Tap the Record Audio button , and when you’re ready, tap Record. After a 3-second countdown, begin recording.
- When you’re done, tap Stop.
- Do one of the following:
- To delete the recording and dismiss the recording controls: Tap Cancel.
- To start the countdown again and record a new audio clip: Tap Record again.
- To listen to the recording: Tap Play.
- To keep the recording and add it to your project: Tap Accept.
Add Audio and Music:
Now it’s time for the finishing touches.
- With your project open, scroll the timeline so that the playhead appears over the place where you want the audio to begin.
- Tap the Add Media button , then tap Audio.
- If prompted, allow access to your music library.
- To find music previously synced to your device from your computer, tap Albums or tap more for more options.
- To listen to the music and audio clips before adding it, tap the play symbol.
- To add the music to your movie project, tap the item.
- To add music or audio clips from iCloudDrive or Dropbox tap the import button .
- Once imported you can see a speaker symbol on top of the frames thumbnail within the frame-by-frame editor.